How to get reports from Paystation
On this page:
Summary Reports
Summary Reports returns the number of transactions performed each month. You can run a report for a single month or a range of months.
Select the first and last months in the range and press Run Report. The transaction data displayed is from the beginning of the first day of the first month to the end of the last day of the end month. It also gives a breakdown of how many transactions were successful and failed.
Tick the box Include test transactions to view test transactions and Include incomplete transactions to view incomplete transactions.
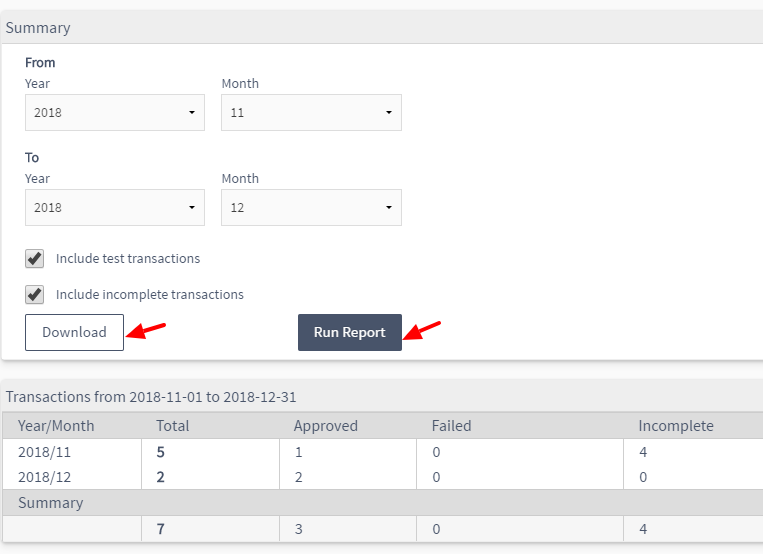
The Download button allows the report to be downloaded as a CSV file.
Settlement Reports
Use Settlement Reports to view the transactions amounts settled in your account each day.

Reminder: Settlement does not always happen on the same day a transaction is processed.
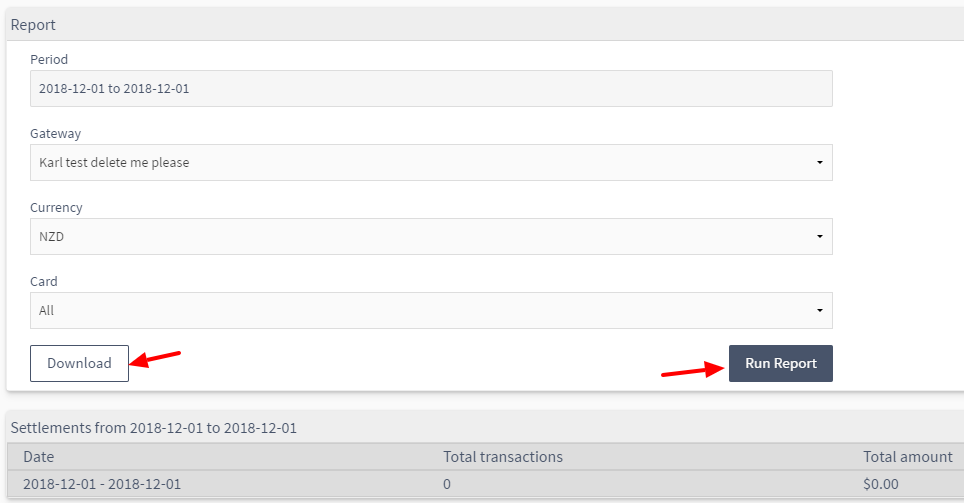
The Download button downloads the report as a CSV file.
Custom Reports
Custom reports allows merchants to create reports which include data they find relevant to their business processes.
Open Custom Reports to customise the fields you can view in a transaction report.

The New Report button will start the process to build the customized report.

The available fields will then appear as below. You can copy available fields from an existing report and then add new fields to it to create a custom report.
Let’s select the ‘Download All Transactions’ report as a base and then Load.

Fill out the report name.
Select the All Account Users check box if you wish for the report to be available to all users.
Delete a field
The “bin” icon will delete a field.
Replace a field by another one
You can expand each existing field to replace it by another one.
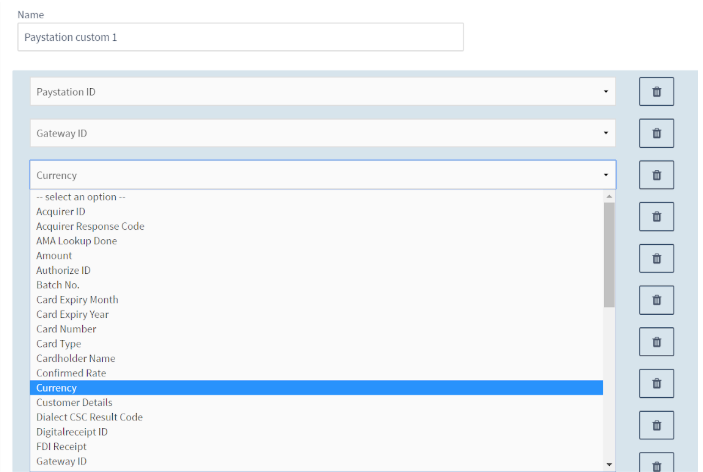
Add a new field
The Add button will add a new field. The new field will appear at the bottom of the page.

Once you have added all customized fields you can Save the report.
Note: You need to Name the report to be able to save it.
The report is now listed on the main Custom Reports page and you can access it from there.
Automated Reports
Automated reporting allows you to receive transaction reports for settlement purposes directly to your email.
You can automate transaction reporting for settlement purposes and more using Automated Reports.
Start with New report button.

To create a new report fill out the following information :
- Name: The name that you wish to give to this report.
- Report: Choose the report that you wish to automate (custom or standard).
- Schedule: How often you want the report to run.
- Attachment type: Report sent as a text or a zip file Include test transactions.

Then fill the Report Parameters:
- Include test transactions: select this check box.
- Gateway: Select All, or individual gateways for your report.
- Currency: Select All, or individual currencies for your report.
- Transaction Types: Select the different types of transactions you wish to filter by – All, Purchase, Refund, Authorisation, Capture, or Token Save Only.
- Transaction Status: Filter by Successful, Failed, or Incomplete transactions.
- Email Recipients: Who you want the report to go to. The Add button allows you to add the email address.
- CC: Additional recipient you want the report to go to. The Add button allows you to add the email address.
Save the report. Once you have saved your report a confirmation message highlighted in green will appear at the top of the page.

The report is now listed on the main Automated Report page and you can access it from there.
Back to Top